Monday, April 25, 2011

Earrings for Remi

I am not much in the blogging mood but here is a quick look at  some earrings I am making for my four year old.  She loses them so quickly, we decided that we would just start making them as it is cheaper.  Sorry the pics are pretty dark.  Some days me and the camera just do not work.

A pink beaded set, and a thread crochet than beaded set.


Purple thread crochet than beaded with pink beads.
I actually created four sets last night but the last couple of pics of the pink beaded hoops were badly out of focus.

She is such a doll when she wants to be.

Remi happily showing off a pair of her new earrings that she loves.  She is also quick to tell me that I need to make a bunch more...okay then.

Saturday, April 23, 2011

A Busy Day

Today was a wonderfully busy and FUN day.  My husband and I got the girls to help us clean both of the cars and we dyed Easter eggs.  This was a first for our girls since in the past we always opted for plastic eggs.  It was a super fun day and I can say that next year we will definitely dye eggs again.  It was a great moment with the girls.

Butter Tub Easter Basket 2 - The Sewn Version

Okay, I created an Easter basket using a butter tub and crochet for my younger daughter because I thought I was short an Easter Basket.  Well turns out I was short both Easter baskets since I can not recall where I stashed the one good one. 

My older daughter was thrilled to hear the news that I was going to have to quickly whip her up an Easter basket.  She immediately told me she didn't want hers to be like her sister Tate's but that I needed to sew her basket. 

Okay, bossy elder child of mine.  So I went scrounging through my meager fabric and trim stash and found some super cute animal print flannel and some white ruffled trim and using a butter tub as a base and created a really simple and cute Easter basket that looks entirely different from the first one. 

I always seem to be saving all sorts of close-able containers as long as I can think of two immediate ideas on how to reuse it, other wise it goes into the recycling/garbage bin.  I don't just keep things I think I can reuse, I have to have an actual idea and need in mind because I sure don't like clutter and I definitely don't want to become some crazy hoarder or garbage.

This basket was really easy to sew up, and stitch onto the butter tub.  I punched holes at the top just like I did to the first tub I created.

Hope you like it.  I sure do love sewing on my new machine.  So much nicer than that old mechanical Singer that the timing kept needing to be reset.

Friday, April 22, 2011

Easter,recycling and other projects.

I have been busy, with many different projects and thought I would share some of what I am working on or have completed these last couple of days. 


My daughters love, and I mean LOVE to draw.  So I try to make it a habit to always have something to write with and something to write on for the girls on my person and am often picking up cheap or discounted notebooks, pads, journals when I spot them.  Big Lots and the dollar store are two of my favorite stores for these types of items. 

Recently I decided to make a few out of leftover cuts of scrap paper.  Here are two that I made, with plans to make more of varying shapes, and sizes since these are a HUGE hit with my girls. Might be because they get to help scrounge up the paper or simply helping push the handle on the paper punch but hey, if it entertains them and gets the job done that's a win win in my book. 

I think these first ones came out well, and am excited to work on more.  Wish I had more scrapbook stuff on hand.  Wow! It sure can take a while to build up a decent variety to work with.  It has been fun though, hunting discounts for things I or more daughters might use.

Okay, this next project was a last minute idea when I realized that only one of last years Easter baskets had survived.  I didn't want to purchase one so decided to recycle a butter tub and sacrifice it to my Easter Basket idea.  It actually came out awesome if I do say so myself, and I do. 

This is how I did it.  

1.  Took a large butter tub and used a small hole punch to punch holes around the entire top lip of the container.

2.  Used a small crochet hook that fit easily through the holes to thread my yarn through creating a foundation from which I can crochet.

3.  Crocheted around the tub doing a double crochet until I had enough rows crocheted to wrap around the bottom a bit.  (The first row is the hardest and I had to use the small hook to pull the yarn through and up to the larger hook but this is only necessary for the first row as it is so tight.)

4.  Took a long length of yarn the same color and threaded a yarn needle which I used to pull in the bottom of the crocheted basket and then tied off in a secure knot, cut and hid the tail.

5.  Crocheted a handle to desired length and stitched it on through the holes in the tub. 

Voila! Recycled Easter Basket.  It was a pretty quick, super easy, and cute last minute project to complete.  Obviously you could further embellish the basket or do fancy stitches but this one does the trick.  Probably could have made it look like a bunny head but really this was a fly by the seat of my pants project.  I didn't have any instructions, just created as I went.
Complete Easter Basket from butter tub and yarn. 
I hope everyone has a wonderful Holiday!

Tuesday, April 19, 2011

How do you learn best?

I am a self taught crochet and knitter as well as sewer, baker, cook, etc.  As for my learning style, well, I read and do, and try, and screw up sometimes, and do again.  I have a few crochet patterns and books picked up through the years but find other than perusing them every now and again for pure entertainment, inspiration, and eye candy I rarely follow the actual patterns.  I am happiest creating my stuff from scratch and am quite comfortable with my trial and error ways.

Other than the steps for an actual stitch, the books and patterns sit in a pretty pile in my craft/office room.  Oh! Have I mentioned that I am an avid reader and will seriously read just about anything. My husband finds this amusing as he has found me curled up with a Nuclear Physics book, a good drink and a blanket and so engrossed you would have thought I was studying for a major exam or reading a steamy romance.  I just really love to read and all books are sacred brain candy.

Some of the crochet/knit books I have hanging around and love to look at or read are:
Around the Corner Crochet Borders: 150 Colorful, Creative Edging Designs with Charts and Instructions for Turning the Corner Perfectly Every Time365 Knitting Stitches a Year Perpetual Calendar100 Flowers to Knit & Crochet: A Collection of Beautiful Blooms for Embellishing Garments, Accessories, and More(BEYOND THE SQUARE) CROCHET MOTIFS BY ECKMAN, EDIE[AUTHOR]Paperback{Beyond the Square: Crochet Motifs: 144 Circles, Hexagons, Triangles, Squares, and Other Unexpected Shapes} on 2008The Crochet Stitch Bible400 Knitting Stitches: A Complete Dictionary of Essential Stitch Patterns I admittedly have a serious weakness for books but especially for How-To, DIY, educational, historical and craft books (these are all books, unfortunately, that I do not enjoy looking through on my spiffy Kindle.  It was a Christmas present).  I have a hard time putting down a book with good pictures, instructions or any kind of educational information.

I have numerous cookbooks but don't use a recipe unless I bake.  I have several how to books but prefer to wing it or simply read a products instructions on use and go to town.  I love to learn new things, whether useful in my life or not.  My brain is full to bursting with all sorts of random info.  I am also a research nut when it comes to an idea.  If I don't know, but get a hankering to, I will research the subject to death until I do know, and know as much about it as I can (this however in no way makes me an expert as I do not have the following certificate to certify my knowledge).  This is probably due to my avid desire to learn and read but strangely this desire disappears when in a classroom environment.  LOL! I just hate how limited the classroom feels to me.  Boo! I would probably have twelve or more degrees by now if I didn't hate structured learning so much.

Oh well! I am well aware that a degree does not equal talent/smart and smart/talent does not always equal a degree but they sure come in handy when getting a nice job, don't they.  Those HR people sure do like paper certificates of all kinds (good thing I have a few stashed away if I ever need them). 

I am much more a hands on, trial and error, self taught/paced sort of individual.  I prefer to learn by doing.  This doesn't mean I do not like being taught because I really do love to learn, just not for hours on end in some boringly over chilled/heated classroom with a hundred other souls taking up the surrounding space while some professor drones on and on and I am expected to take notes, remember said dull lecture and actually absorb/learn something.  Nah! That is so not my style.    I think US education needs to take a more vocational/hands on approach and less of book/professor says regurgitation method but that is just me and I know others learn quite well this way or it wouldn't be.

So how do you learn best? Do you follow patterns, instructions and guidelines to a T or are you more like me? Ha! Ha! That last bit rhymed.  I'm a poet now (you can check out some of my work through poetry.com *snickers* )

P.S. I do actually have poetry on poetry.com but that was merely me making a joke about my accidental rhyme.

Monday, April 18, 2011

Todays Random Projects

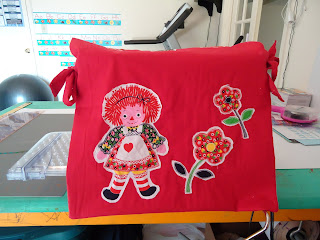
Today while scrounging through my pitifully small fabric stash to find inspiration for a quick sewing project I've been meaning to tackle I came across my Raggedy Ann Doll yardage.  I had totally forgotten about this fabric.  It is Raggedy Ann, hearts and flowers on an off white background.
I really love this fabric but really didn't want a couple of Raggedy Ann Dolls all over my sewing machine cover.  Oh, did I mention that I was determined to create a cover for my sewing machine today.  I took some of this material and cut out some flowers, hearts and one Raggedy Ann and proceeded to zigzag around them to secure them onto my red fabric, which I decided would make a better background as a dust cover. 
See, nothing fancy.  Just a quick zigzag around my cut out shapes.  I didn't have a pattern so I winged it.  Just created a giant rectangle that would adequately cover my machine with the extension table and knee lift on it and added some ties near the top to help keep it in place.  I love it.  It looks cute, covers, protects, is easy to put on/take off and was super easy to make.  Plus, I already had all of the materials in my bin.
Front of machine

Back of machine

As for my other project....well it is a work in progress with my four year old daughter.  We are beginning to create an alphabet card set that actually appeals to her.  So with her input (lots and lots of it) we created the first one of, well, many to come.  I am constantly trying new things and am always on the hunt for interesting ways to introduce educational concepts and ideas to my girls. 
A is for Art
She gets to pick out all of the elements, embellishments, papers, and do-dads she wants on each card and help put is together.  Each week is another letter.  This is now going to be a part of her weekly alphabet education. 

We just came back around to the Letter A again and thought this would add something more to her work, writings, identification and allow her to express herself and be creative while she is learning.  I figure it helps her remember the letters better since the entire time we talk about the letter while we are making her new alphabet card.  It is the size of a basic ATC. 

She is so excited about this and asks how we are going to display her work.  If anyone has a good creative suggestion please feel free to drop it in the comments.  Our office already has a clothes line style art line on two of the walls, so there is limited wall space.  I was thinking of making an open front frame a bit larger than the cards and having some kind of clip to keep the card on display in the frame on our work table and just rotate out each week.  Still need to figure out how to store them though.
 

Sunday, April 17, 2011

Remi's Doll 2

Yep! Purple hair now complete.
Hooray! I finally completed my daughter's rag doll.  I created a Waldorf yarn wig for this doll.  So very simple to do.  There are numerous resources online if you are interested in doing this style of doll hair yourself and do not know how to do it.  I simple sandwiched my yarn between two pieces of wax paper and used painters tape to hold the strands of yarn in place on the wax paper and sewed  down the middle about four times.  Remove the tape from the yarn and gently pull away the wax paper.  Then I sewed the hair onto the doll with yarn simply going over the sewn seam.  I pulled the hair into side pony tails to cover the back and stitched them into place.  Voila! The hair is complete. 
Back of the doll
I also go around to crocheting up a matching skirt that is attached to the shirt and hence not removable per my daughter's request so that her little sister can not strip her doll naked. 
Remi's complete rag doll.
Remi is totally in love with her new doll and now totes her around the house and to bed every night.  Looks like I will have to begin another rag doll for her sister as she is telling me that Tate needs to have her own rag doll too.

This was a super fun and easy project and my children got to be involved.  Don't be afraid to fail, because in trying you may actually accomplish something pretty cool.

Thursday, April 14, 2011

Salvaging a New Dress

We purchased this cute purple dress not even a week ago for my four year old and not even a week later she had ruined it by getting gum stuck on it, not telling me, stuffing it into the laundry where of course the gum went unnoticed and was consequently washed indefinitely into the fabric.  Luckily it ruined this clothing item only and nothing else in the load. 
Horrible fused gum blob/mess.


I was pretty sad as she had only worn this new dress of hers once.  While carrying it to the trash I was contemplating another sewing project and got the idea to salvage this one by chopping the top off and making a skirt since the gum only effected the top of the otherwise salvageable dress.  So I went ahead and cut off the damaged shirt portion leaving enough to create a new waist line hem and leave some of the purple and black striped fabric.  I then salvaged the tulle rose from the top have of the garment, tossed the top, pinned and proceeded with my salvage job. 
I used a rotary cutter and went to town.
Removed tulle flower.
Salvaged tulle flower.

Right before I sewed it up, sewed the flower on and tacked it to fit my skinny kids waist.
I did try taking a picture of my four year old running around in her new/salvaged skirt but she wouldn't stand still.  It looks super cute, and you would never know that it was once a dress.

Tuesday, April 12, 2011

Remi's Dolly

So a few months back now, I created this doll, she is to be a Christmas gift for a friends' daughter.
I found that after creating this doll it somehow become my job as mommy to create all sorts of dolls for my daughters recently.

This is my current work in progress, designed by my four year old.  She was very specific about her doll being fat bodied with skinny arms and legs, buttons for eyes and a pink sewn on mouth. Oh! Also, she must have purple hair.  So I have been working with my daughter on this doll of hers for a couple of weeks now.  She helped me create the pattern, choose the fabric, stuff the doll which she graciously said I could sew by myself, choose the buttons, and embroider the mouth (that took some serious patience on my part to not simply tell her to just let me do it). 
So now I am in the process of crocheting up some clothes that can't be stripped off the doll.  Since my oldest doesn't want her little sister, who has a penchant for naked dolls, to denude her dolly.  This is how far we have gotten to date.

Since this is a doll for my older daughter, it is her job to help me as much as she can.  She hasn't quite gotten the hang of crocheting yet, though she sure does try and creates some seriously spectacular knots in the process. So for the most part she just tells me how to do what she wants done.  LOL! She really does know how to boss you around though.

As for the dolls purple hair, it will have to wait until after a run to buy yarn.  I do not currently have any purple yarn on hand, which is odd, but does occasionally happen.  My daughters are prone to purchasing me neon bright yarns, and any yarns that are purple and pink when birthdays and holidays role around.  Since they both know mommy likes yarn.

I will update you all later on the progress Remi and I make on her doll.


Saturday, April 9, 2011

What 2 do and Questions for U

So I will be blogging a how-to on a scarf to shrug in the future but that is on hold like our paycheck because I do not have any yarn I would like to use to do this or an already made scarf that would be suitable.  Military LES will be a week or so behind so in the mean time I am trying to think of some great ideas that won't involve me purchasing some new yarn.  I have mostly yarn not really suitable to clothing, as in acrylic.  

Nothing wrong with acrylic for accessories like hats and scarves, small items, and toys but as a rule I try to steer clear of it when I make clothing items unless my child insists on some crazy bright color that for whatever reason seems only to be made in an acrylic yarn. I probably have an irrational fear of flames and acrylic yarn but it is something I just can't get past.  Funny too since I spent a good deal of time crocheting up a huge bright afghan for my daughter but she is not allowed to sleep with it on her bed at night.  That darn irrational fear of mine. 

I have been scouring the internet lately trying to find some awesome local yarn carries here in the Florida Panhandle around Eglin AFB but really having a hard time finding anything besides big box places.  May just have to spend a day driving around and hope I stumble upon one or head to Pensacola.  Not looking forward to that.  I am not a shopper and really would prefer to know exactly where I am going and what I am looking for (as in what they carry). 

All of this talk of yarn has made me curious.  What type of yarn do you prefer? Weight, color, or texture preference? Do you hoard yarns, shop as needed, or keep a specific supply on hand? Do you keep multiple sets of hooks/needles or simply switch out for each project? How many WIPs do you have on average or are you more like me and prefer to finish one project before you start a new one (though at the moment I do have one WIP I could be working on but it doesn't even need to be finished for almost a year)? How do you organize your WIPs? Do you organize your yarn? Where/when do you create?  Do you have a certain process you go through each time you create?  What do you do with your left over yarn, and swatches? Sorry, that was a barrage of questions. 

Maybe I will pull out that WIP since right now I seem to be in a pickle and not able to move on to that next project I would like to do.  I would really love to hear about your YARN and ALL.  

Thursday, April 7, 2011

Inspired Shrug....in miniature.

So after tweeting "Need ideas for my next #crochet project.....any suggestions?" @KrisFisher tweeted back "@ a shrug, then share the pattern with me cuz I'm having trouble w/1 I'm wrking on".  Well it made me think of a couple I have seen on youtube and ravelry....I did send her the ravelry link but could not find the one I had seen on youtube.  It was super frustrating because I thought it was a super easy shrug and super cute.

So I decided I would try to recreate the youtube shrug idea and at that time my two year old came up to me wanting to sit in my lap dragging around her mini perpetually naked cabbage patch doll and the idea to create it in miniature was born.

I scrounged through my "last bits" yarn basket to find the brightest yarn possible in hopes that after I made this mini shrug my daughter would actually leave it on her doll.

The shrug in the video was made from a square into a circle but could just as easily be made from a circle to a circle or from a rectangle for more coverage in the back.  First you measure across your back to determine how wide the square will be and crochet out enough chains for this.  You create your square or rectangle to desired size with really any stitch or stitch pattern that you desire.  Heck, you could even make the back from granny squares.

Once you have your square you determine the number of chains you are going to need to create your arm hole.  This is pretty forgiving because it can be as tight or as loose as you want.


Connect your chain like so with a slip stitch and crochet the number of stitches down this side as there are on the opposite side so that your pattern is even and symmetrical. Make and connect another chain with the same number of stitches as your last chain like so.

Now all you have to do is crochet around your shape making it into a circle, keeping in mind to evenly increase as you go to keep your circle flat and symmetrical.


Crochet as many times around as necessary to get your shrug to proper size, don't forget to try it on as you go frequently from the complete armhole chains on so that you can adjust your pattern where needed.  Once you have your shrug to size you can now add your "flair" or decorative edging, tie, buttons, whatever to add your personality like so. 
My only suggestions would be to not crochet this using a worsted weight acrylic yarn.  It would be softer, fall better and not blisteringly hot, and much more comfortable in a soft non acrylic yarn of a much lighter weight.  I would just swatch a few I was considering.  As for the circle to circle shrug, very same concept only you start with a circle, work it out to desired diameter to cover desired amount of back.  Create armholes the same way and continue your circle shrug until complete. 


I hope this has inspired you to try your hand as this simple shrug, even if it is in miniature as mine is.
Thanks to my very cooperative model, my daughter and @KrisFisher for sparking the inspiration.